Key Takeaways
-
Professional paver installation involves comprehensive engineering principles, not just surface-level stone placement
-
Proper site evaluation and base preparation are crucial for long-lasting paver installations, requiring 7-12 inches of careful excavation
-
Choose materials that complement your property's architecture and match specific functional requirements like traffic load
-
Professional installers provide precise paver laying with systematic placement, maintaining consistent spacing and managing color variations
-
Quality edge restraints and polymeric sand are essential for preventing paver shifting and ensuring long-term stability
-
Professionally installed pavers can last 30+ years with minimal maintenance and can significantly enhance property value
-
Verify installer credentials by checking experience, portfolio, licensing, insurance, and industry certifications
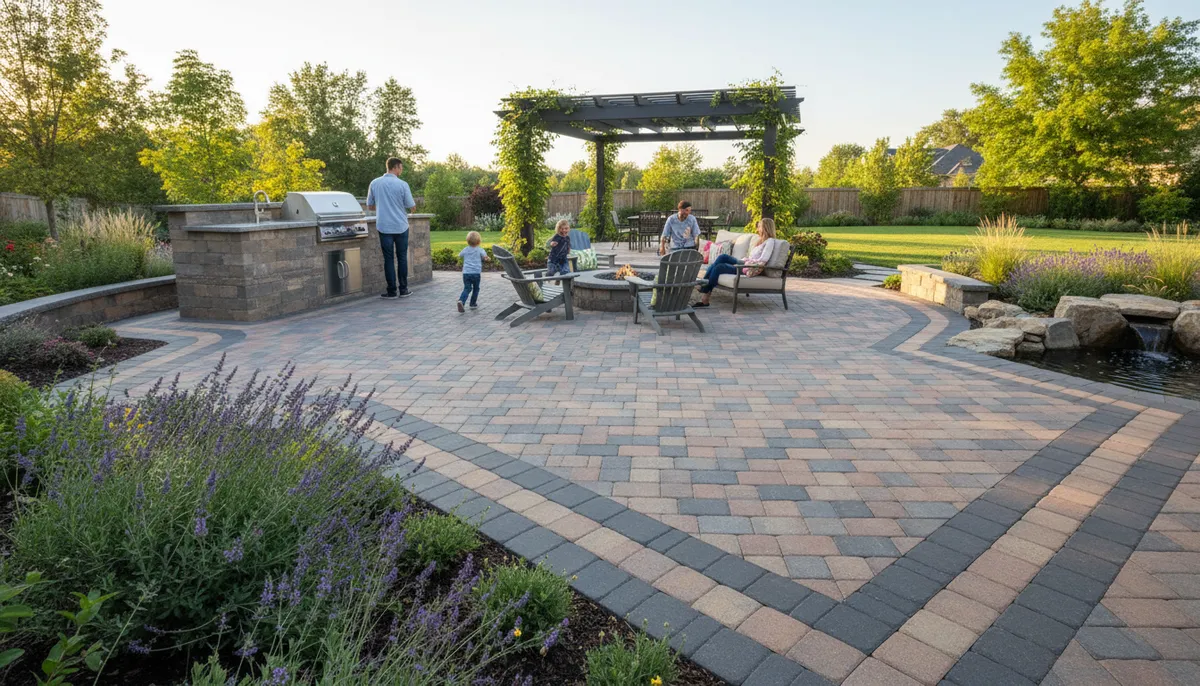
Picture this: you’re sipping your morning coffee on a stunning patio, the sun warming your face as you admire the perfectly laid pavers beneath your feet. Or imagine pulling into your driveway, feeling a surge of pride at the beautiful herringbone pattern that welcomes you home every day. Professional paver installation can transform these dreams into reality, turning ordinary outdoor spaces into extraordinary gathering places that boost your property’s value and your quality of life.
But here’s the thing—not all paver installations are created equal. The difference between a mediocre job and a masterpiece often comes down to expertise, preparation, and attention to detail. Whether you’re a suburban homeowner looking to enhance your backyard oasis or a commercial property manager seeking durable, attractive hardscaping, understanding what goes into professional paver installation will help you make confident decisions and achieve results you’ll love for decades to come.
Let’s walk through everything you need to know about choosing and working with professional paver installers, so you can create outdoor spaces that are as functional as they are beautiful.
Understanding What Makes Paver Installation Truly Professional
Professional paver installation is much more than just laying stones on the ground. It’s a comprehensive process that combines engineering principles, artistic design, and meticulous craftsmanship. When you work with experienced professionals like Serenity Landscape Group, you’re investing in expertise that goes far beyond surface-level aesthetics.
The foundation of quality paver work starts beneath what you can see. Professional installers understand soil composition, drainage patterns, and climate considerations specific to the Chicago area. They know that our freeze-thaw cycles demand proper base preparation, and that shortcuts taken during excavation will show up as problems years down the road.
True professionals also bring design sensibility to the table. They’ll help you select materials that complement your home’s architecture, create patterns that enhance your space’s visual flow, and incorporate features that solve practical challenges. This holistic approach ensures your paver project enhances both beauty and functionality.

The Essential Steps in Professional Paver Installation
Understanding the installation process helps you appreciate the value of professional work and know what to expect from your project. Here’s how expert installers transform your outdoor space:
Site Evaluation and Design Consultation
Every successful paver project begins with a thorough onsite evaluation. Professional installers will walk your property, assess soil conditions, note existing drainage patterns, and discuss your vision for the space. They’ll take measurements, photograph the area, and ask questions about how you plan to use the finished space.
During this phase, they’ll also identify potential challenges—maybe there’s a slope that needs addressing, tree roots that require special attention, or underground utilities that need marking. This upfront investigation prevents surprises and ensures accurate project estimates.
Material Selection and Planning
Once the site is evaluated, your installer will guide you through material options. Concrete pavers offer durability and versatility at various price points. Natural stone brings timeless elegance and unique character. Brick pavers provide classic charm that complements traditional architecture.
Your professional installer will explain the pros and cons of each material for your specific application. Driveways need pavers rated for vehicular traffic, while fire pits and seating areas can accommodate more decorative options. They’ll also discuss colors, textures, and patterns that align with your aesthetic goals.
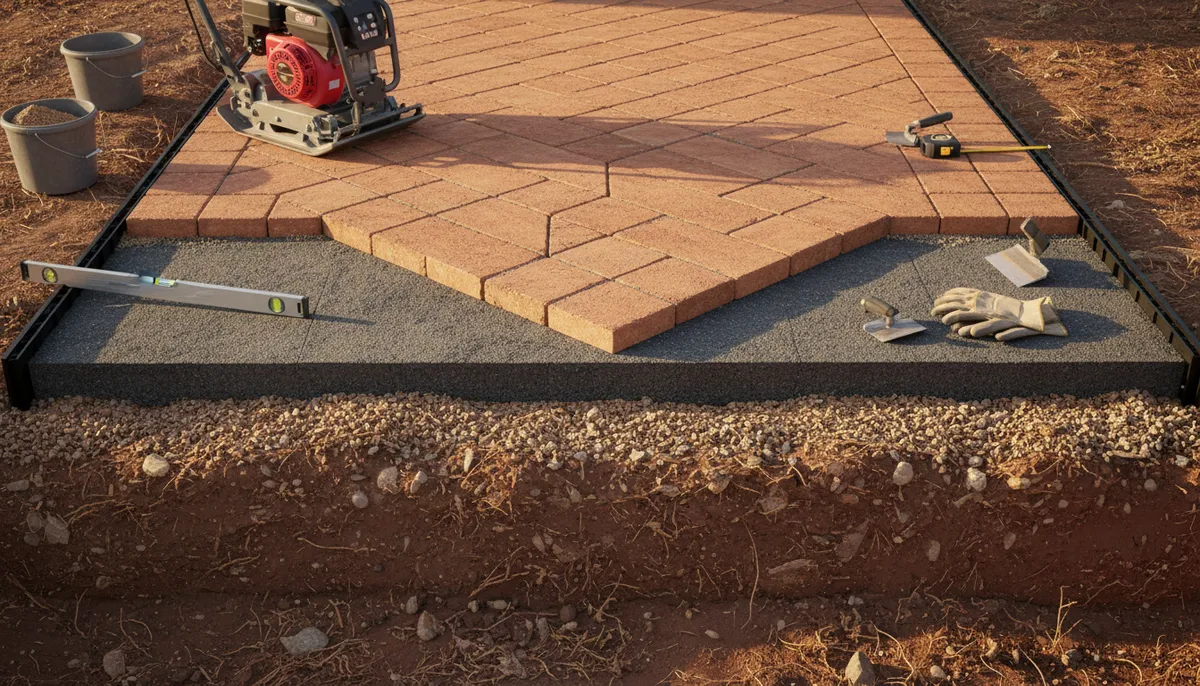
Excavation and Base Preparation
This is where the real work begins, and it’s absolutely critical to your project’s longevity. Professional installers excavate to the proper depth—typically 7-9 inches for pedestrian areas and 10-12 inches for driveways—removing soil and creating a clean, level base.
Next comes the foundation layer: compacted road base or crushed stone. This layer provides stability, prevents settling, and facilitates proper drainage. Professionals use plate compactors or mechanical rollers to achieve the right density, checking their work with levels and grade tools to ensure perfect slopes for water runoff.
A layer of leveling sand goes on top of the compacted base. This fine material creates a smooth, even surface for paver placement and allows for minor adjustments during installation. The sand is screeded to exact specifications, creating the perfect bed for your pavers.
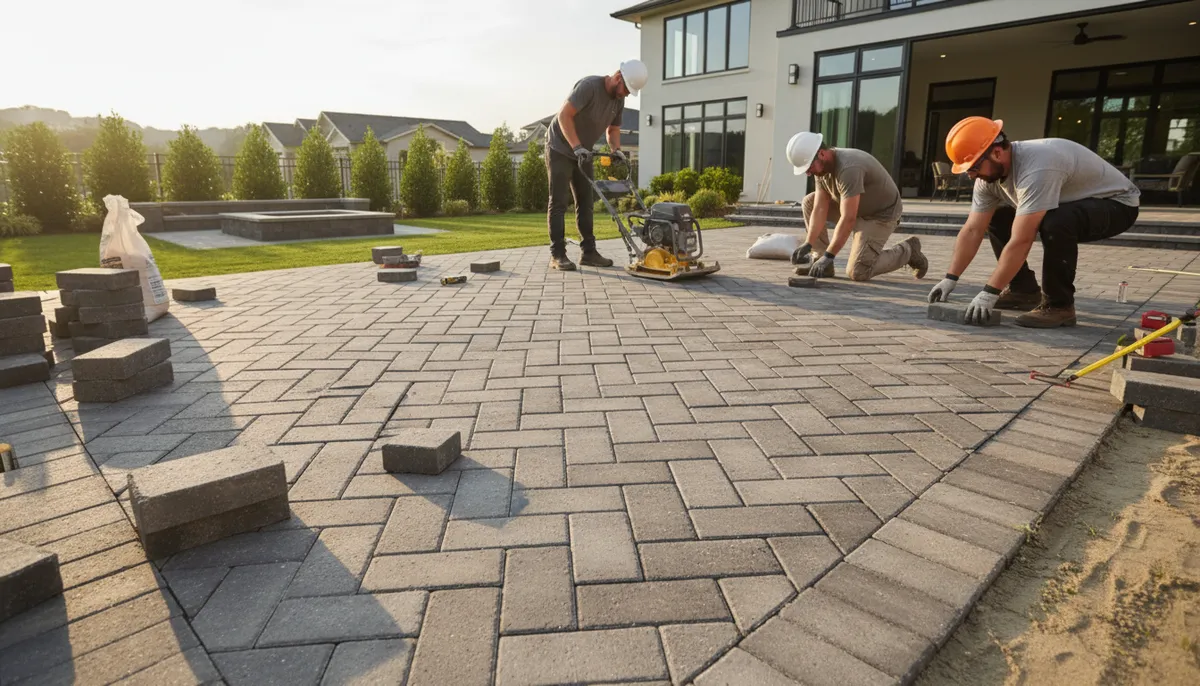
Paver Laying and Pattern Creation
Now comes the artistry. Professional installers begin laying pavers according to your chosen pattern—herringbone, running bond, basketweave, or custom designs. They work systematically, maintaining consistent spacing and alignment while checking levels frequently.
Quality installers cut pavers with precision when needed, creating clean edges and professional transitions around obstacles. They pay attention to color variation, distributing pavers from multiple pallets to ensure natural blending and avoid color banding that can occur if all pavers come from a single batch.
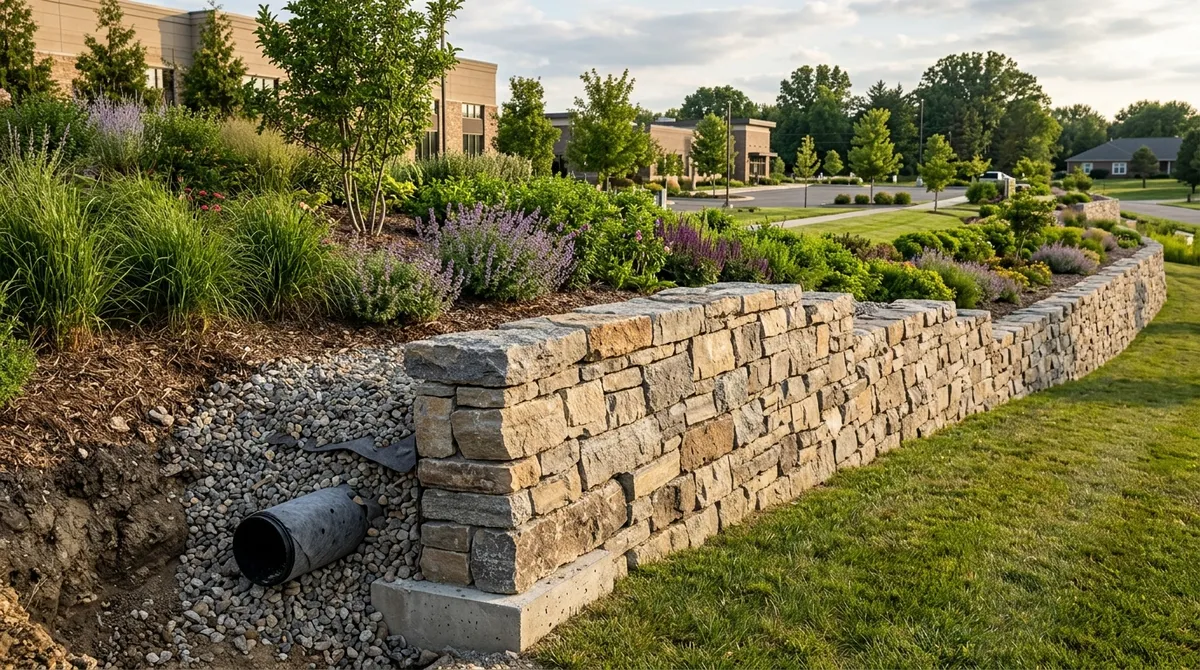
Edge Restraints and Stabilization
Edge restraints are the unsung heroes of paver installations. These aluminum, plastic, or concrete borders hold pavers in place, preventing shifting and maintaining pattern integrity. Professional installers secure these restraints with spikes driven into the compacted base, creating a permanent framework for your pavers.
After the pavers are laid and edges secured, installers sweep polymeric sand or fine joint sand into the spaces between pavers. This sand locks everything together, prevents weed growth, and resists washout from rain. The entire surface is then compacted again, pressing pavers firmly into the sand bed and ensuring maximum stability.
Final Compaction and Cleanup
A final pass with the plate compactor settles everything into place. Professional installers then sweep excess sand, rinse the surface if needed, and conduct a thorough quality inspection. They’ll check for level surfaces, proper drainage slopes, and secure edges before considering the job complete.
The best professionals also take pride in leaving your property clean. They’ll haul away excavated material, dispose of packaging, and ensure your lawn and surrounding areas are restored to pristine condition.
Popular Applications for Professional Paver Installation
Professional paver installation can transform virtually any outdoor area. Here are the most popular applications homeowners and businesses choose:
- Driveways: Paver driveways combine durability with curb appeal, handling vehicle traffic while making a stunning first impression. They’re easier to repair than concrete and won’t show cracks as readily.
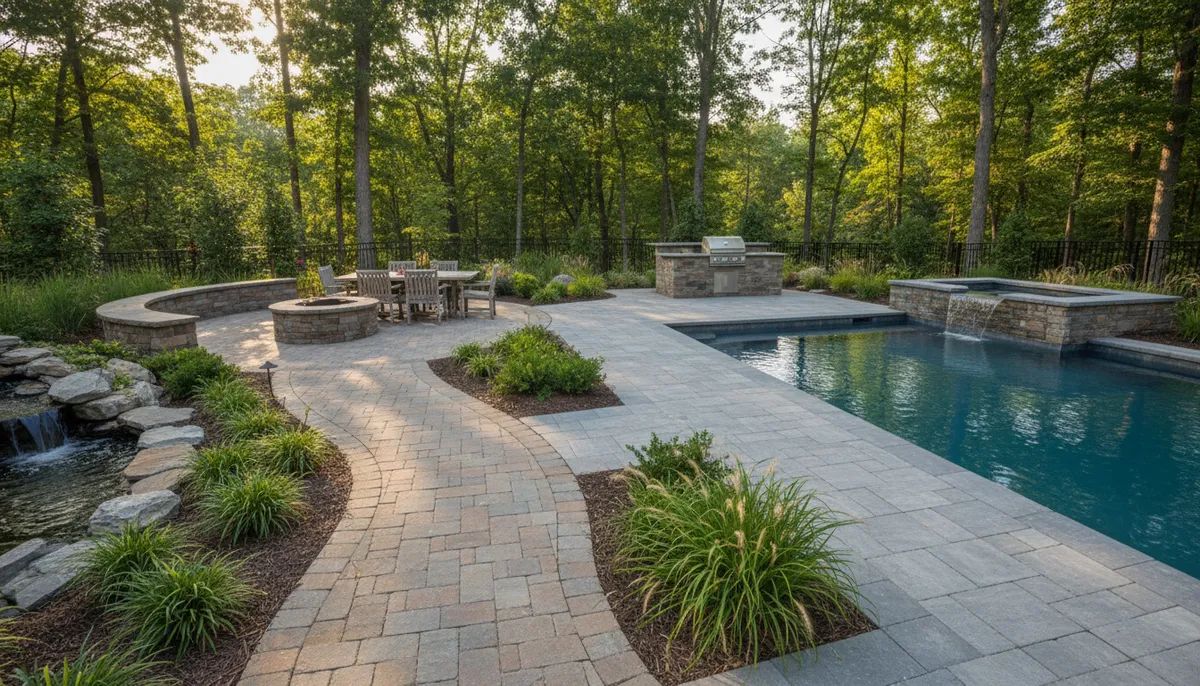
- Patios and Outdoor Living Areas: Create the perfect backdrop for entertaining, dining, or relaxation. Paver patios extend your living space outdoors and can be customized to any size or shape.
- Pool Decks: Pavers provide slip-resistant surfaces that stay cooler underfoot than concrete. They’re perfect for pool surrounds and create resort-style atmospheres.
- Walkways and Garden Paths: Guide visitors through your landscape while adding visual interest. Curved paths create journey experiences, while straight walks provide efficient access.
- Courtyards and Entryways: Make memorable first impressions with beautifully paved entry areas. These spaces set the tone for your entire property.
Key Benefits of Choosing Professional Paver Installation
Investing in professional paver installation delivers advantages that DIY projects or budget installations simply can’t match. Understanding these benefits helps you appreciate the value of quality workmanship.
Exceptional Durability and Longevity
Properly installed pavers can last 30 years or more with minimal maintenance. The flexible nature of paver systems allows them to adapt to minor ground movements without cracking, unlike poured concrete. When installed by professionals who account for local climate conditions, your pavers will withstand Chicago’s harsh winters, hot summers, and everything in between.
Professional installers use proper base depths and compaction techniques that prevent settling, sinking, and shifting. They also install effective drainage solutions that protect your investment from water damage and frost heave.
Low Maintenance Requirements
One of the biggest advantages of professionally installed pavers is how little upkeep they require. Unlike wood decking that needs regular staining or concrete that requires periodic sealing and crack repair, pavers are remarkably self-sufficient.
Occasional sweeping and rinsing keep them looking fresh. If a paver becomes stained or damaged, you can replace individual units without disturbing the surrounding area—something impossible with poured surfaces. The joint sand used by professionals also inhibits weed growth, reducing maintenance time even further.
Enhanced Property Value and Curb Appeal
Professional paver installation significantly boosts property value. Real estate experts consistently rank quality hardscaping among the top improvements for return on investment. Beautiful paver features create immediate curb appeal that attracts buyers and justifies higher asking prices.
Beyond monetary value, well-designed paver installations enhance your daily living experience. They create functional outdoor rooms for entertaining, provide safe walking surfaces, and transform ordinary yards into magazine-worthy landscapes.
Safety and Accessibility
Professional installers prioritize safety in their designs. Textured paver surfaces provide excellent slip resistance, even when wet. Properly graded installations prevent water pooling that could create hazards or ice in winter.
Professionals can also incorporate accessibility features into paver designs, creating smooth transitions, appropriate slopes, and stable surfaces that accommodate wheelchairs, walkers, and strollers. This thoughtful planning ensures everyone can enjoy your outdoor spaces safely.
Comparing Paver Materials: Making the Right Choice
The material you select impacts your project’s appearance, durability, maintenance needs, and budget. Here’s a comparison of popular paver materials to help guide your decision:
| Material Type | Durability | Maintenance | Price Range | Best Applications |
|---|---|---|---|---|
| Concrete Pavers | Excellent | Very Low | $$ – $$$ | Driveways, patios, walkways |
| Brick Pavers | Very Good | Low | $$$ – $$$$ | Traditional homes, walkways, courtyards |
| Natural Stone | Excellent | Low to Moderate | $$$$ – $$$$$ | High-end patios, pool decks, entryways |
| Flagstone | Very Good | Moderate | $$$ – $$$$ | Garden paths, rustic patios, natural landscapes |
Your professional installer will help you select materials that balance aesthetic preferences, functional requirements, and budget considerations. They’ll also source quality materials from reputable suppliers, ensuring you receive pavers that meet industry standards for your climate.
What to Look for in a Professional Paver Installer
Not all paver installers offer the same level of expertise and service. Here are the key qualities that separate true professionals from less qualified contractors:
Experience and Portfolio
Look for installers with substantial experience—ideally ten years or more. Ask to see their portfolio of completed projects, paying attention to variety and quality. Do their previous installations show attention to detail? Are edges crisp and patterns consistent?
Companies like Serenity Landscape Group bring over two decades of experience to every project, and their extensive gallery of work demonstrates consistent quality across diverse applications.
Proper Licensing and Insurance
Professional installers carry appropriate licensing and comprehensive insurance coverage. This protects you from liability if accidents occur on your property and provides recourse if work doesn’t meet standards. Don’t hesitate to ask for proof of insurance and verify licenses with local authorities.
Reputable installers will readily provide this documentation. If a contractor seems hesitant or makes excuses, consider it a red flag and continue your search.
Detailed Written Estimates
Professional installers provide comprehensive written estimates that break down costs for materials, labor, equipment, and additional services. These estimates should specify paver types, quantities, base materials, edge restraints, and any warranty information.
Vague or verbal estimates often lead to misunderstandings and surprise charges. Insist on detailed documentation that clearly outlines the project scope, timeline, and total investment required.
Clear Communication and Customer Service
Pay attention to how potential installers communicate during initial consultations. Do they listen to your ideas? Ask thoughtful questions? Offer suggestions based on your specific needs? Professional installers value clear communication and work collaboratively to bring your vision to life.
They should also be responsive to phone calls and emails, provide realistic timelines, and explain their process clearly. Good communication during the planning phase typically translates to smooth project execution.
Industry Certifications and Affiliations
Look for installers who invest in ongoing education and maintain industry certifications. Organizations like the ICPI (Interlocking Concrete Pavement Institute) offer certification programs that demonstrate technical knowledge and commitment to best practices.
Membership in professional associations like Landscape Illinois also indicates an installer’s dedication to staying current with industry standards and maintaining professional connections.
Understanding the Cost Factors in Professional Paver Installation
Paver installation costs vary based on several factors. Understanding these variables helps you budget appropriately and evaluate estimates accurately.
Project Size and Complexity
Larger projects typically cost less per square foot than smaller ones due to economies of scale. However, complexity adds cost regardless of size. Intricate patterns, multiple elevations, curved edges, and custom designs require more labor and skill, increasing overall investment.
Site conditions also impact cost. Steep slopes, poor soil, challenging access, or existing structures that need working around all add complexity and expense to projects.
Material Selection
Your material choice significantly affects project cost. Basic concrete pavers offer excellent value, while premium natural stone commands higher prices. Color options, specialty finishes, and brand selections also influence material costs.
Remember that the least expensive option isn’t always the best value. Quality materials installed professionally deliver better long-term performance and appearance, potentially saving money over your pavers’ lifetime.
Base Preparation Requirements
Proper base preparation is non-negotiable for professional installations, but some sites require more extensive work than others. Properties with poor drainage, unstable soil, or significant elevation changes need additional base materials and labor.
Don’t be tempted by installers who cut corners on base preparation to offer lower bids. The foundation is critical to your project’s success, and skimping here inevitably leads to costly problems later.
Additional Features and Services
Many paver projects include complementary features that enhance functionality and aesthetics. Lighting and sound systems, retaining walls, softscapes, and seating areas all add to project costs but create more complete, usable outdoor spaces.
Discuss your full vision with installers during consultations. Bundling multiple services often provides better value than tackling projects piecemeal, and comprehensive planning ensures all elements work together harmoniously.
Preparing Your Property for Professional Paver Installation
While professional installers handle the heavy lifting, you can take steps to ensure smooth project execution:
- Clear the work area of furniture, planters, decorations, and other movable items
- Mark any underground utilities like sprinkler lines, electrical cables, or gas pipes
- Trim back overhanging branches or shrubs that might interfere with equipment
- Arrange for pets to be secured away from the work area during installation
- Ensure installers have clear access to the site with room for equipment and material delivery
- Communicate with neighbors about the project timeline and any potential disruptions
Professional installers will provide specific preparation instructions based on your project. Following these guidelines helps avoid delays and ensures your project stays on schedule.
Maintaining Your Professional Paver Installation
One of the greatest advantages of professional paver installation is minimal maintenance requirements. Here’s how to keep your investment looking beautiful for decades:
Regular Cleaning
Sweep your pavers regularly to remove debris, leaves, and dirt. For deeper cleaning, use a garden hose or pressure washer on a low setting. Avoid excessive pressure that could dislodge joint sand or damage paver surfaces.
Address spills and stains promptly. Most substances clean easily with mild detergent and water. For stubborn stains, consult your installer about appropriate cleaning products that won’t damage your specific paver material.
Joint Sand Maintenance
Check joint sand levels annually, particularly after heavy rains or snow melt. Add polymeric or standard joint sand as needed to maintain full joints. This prevents paver shifting and inhibits weed growth.
If weeds do appear, remove them promptly and replenish joint sand. Proper joint filling is your best defense against unwanted vegetation.
Sealing Considerations
While not always necessary, sealing pavers can enhance color, provide stain protection, and simplify cleaning. Discuss sealing options with your installer. Some materials benefit more from sealing than others, and application frequency depends on paver type and exposure conditions.
If you choose to seal, professional application every 3-5 years typically provides optimal protection and appearance enhancement.
Seasonal Care
In Chicago’s climate, winter care is particularly important. Use plastic shovels or snow blowers rather than metal tools that might chip paver edges. Avoid rock salt and harsh de-icers that can damage paver surfaces. Instead, choose calcium chloride or sand for traction.
In spring, inspect your pavers for any winter damage, check that edge restraints remain secure, and address any minor settling before it becomes problematic.
Common Mistakes to Avoid When Hiring Paver Installers
Avoid these common pitfalls that lead to disappointing results or unnecessary expenses:
- Choosing installers based solely on price without verifying experience and credentials
- Accepting verbal agreements instead of detailed written contracts
- Failing to check references or review previous work
- Overlooking the importance of proper base preparation in favor of faster timelines
- Not discussing warranty coverage and long-term support
- Rushing the design phase without fully exploring options and possibilities
Taking time to thoroughly vet installers and understand the process pays dividends in final results and long-term satisfaction.
Questions to Ask Potential Paver Installers
Use these questions to evaluate potential installers and make informed hiring decisions:
- How many years have you specialized in paver installation?
- Can you provide references from recent projects similar to mine?
- What certifications or professional affiliations do you maintain?
- How do you handle base preparation for Chicago’s climate conditions?
- What warranty do you offer on materials and workmanship?
- How do you manage project timelines and weather delays?
- What’s included in your estimate, and what might cost extra?
- How do you handle unexpected site conditions or complications?
Professional installers welcome these questions and provide clear, confident answers. Hesitation or vague responses should raise concerns about their experience or business practices.
Transform Your Outdoor Space with Professional Excellence
Professional paver installation represents an investment in your property’s beauty, functionality, and value. When you choose experienced installers who prioritize quality workmanship, proper techniques, and customer satisfaction, you’re creating outdoor spaces that enhance your daily life and serve you reliably for decades.
The difference between adequate paver work and truly exceptional installations lies in the details—proper excavation depth, thorough base compaction, precise edge restraints, careful material selection, and artistic pattern execution. These elements combine to create surfaces that not only look stunning but also perform flawlessly through years of use and weather exposure.
Whether you envision an elegant patio for summer entertaining, a durable driveway that makes coming home a pleasure, or a complete outdoor transformation with pergolas and pavilions, professional paver installation brings your dreams to life with results that exceed expectations.
At Serenity Landscape Group, we’ve spent over two decades perfecting our craft and creating outdoor spaces that our clients cherish. Our comprehensive approach handles every detail from initial design through final installation and beyond, ensuring your complete satisfaction at every stage.
Ready to explore the possibilities for your property? We’d love to discuss your vision and show you how professional paver installation can transform your outdoor living experience. Get a free estimate today and take the first step toward creating the beautiful, functional outdoor space you’ve always wanted. Your dream landscape is closer than you think—let’s make it a reality together.
FAQs
Q: How long does professional paver installation typically take?
A: Most residential paver projects take 3-7 days from start to finish, depending on size and complexity. A standard patio might be completed in 3-4 days, while larger driveways or intricate designs with multiple features could take a week or more. Weather conditions, site accessibility, and any unexpected challenges can affect timelines, but professional installers will provide realistic estimates and keep you informed throughout the process.
Q: What’s the difference between professional installation and DIY paver projects?
A: Professional installation ensures proper excavation depth, base compaction, drainage planning, and long-term stability that DIY projects often lack. Professionals have specialized equipment for precise grading and compaction, understand local soil conditions and climate factors, and bring design expertise that creates cohesive, beautiful results. While DIY might seem cost-effective initially, improper installation often leads to settling, shifting, and costly repairs that exceed the savings.
Q: How much does professional paver installation cost in the Chicago area?
A: Costs vary based on project size, materials, and complexity, but homeowners typically invest between $15-$30 per square foot for quality paver installation in the Chicago area. Basic concrete paver patios start around $15-$20 per square foot, while premium materials like natural stone can range from $25-$35 or more per square foot. Driveways, intricate patterns, and projects requiring extensive site preparation may cost more, but detailed estimates from professional installers will clarify specific pricing for your project.
Q: Can pavers be installed over existing concrete or do they require complete excavation?
A: Pavers can sometimes be installed over existing concrete if the surface is stable, level, and in good condition, but this isn’t always the best approach. Professional installers evaluate existing surfaces carefully—if the concrete shows significant cracking, settling, or drainage issues, complete removal and proper base preparation will deliver better long-term results. The decision depends on your specific situation, and experienced installers will recommend the approach that ensures lasting performance and beauty.
Q: What warranty should I expect from professional paver installers?
A: Reputable professional installers typically offer workmanship warranties ranging from 1-5 years, covering issues like settling, shifting, or installation defects. Paver manufacturers also provide material warranties, often 25 years or more, against manufacturing defects and color fading. Make sure to get warranty terms in writing and understand what’s covered versus what requires regular maintenance. Quality installers stand behind their work and will address legitimate warranty issues promptly and professionally.