Key Takeaways
-
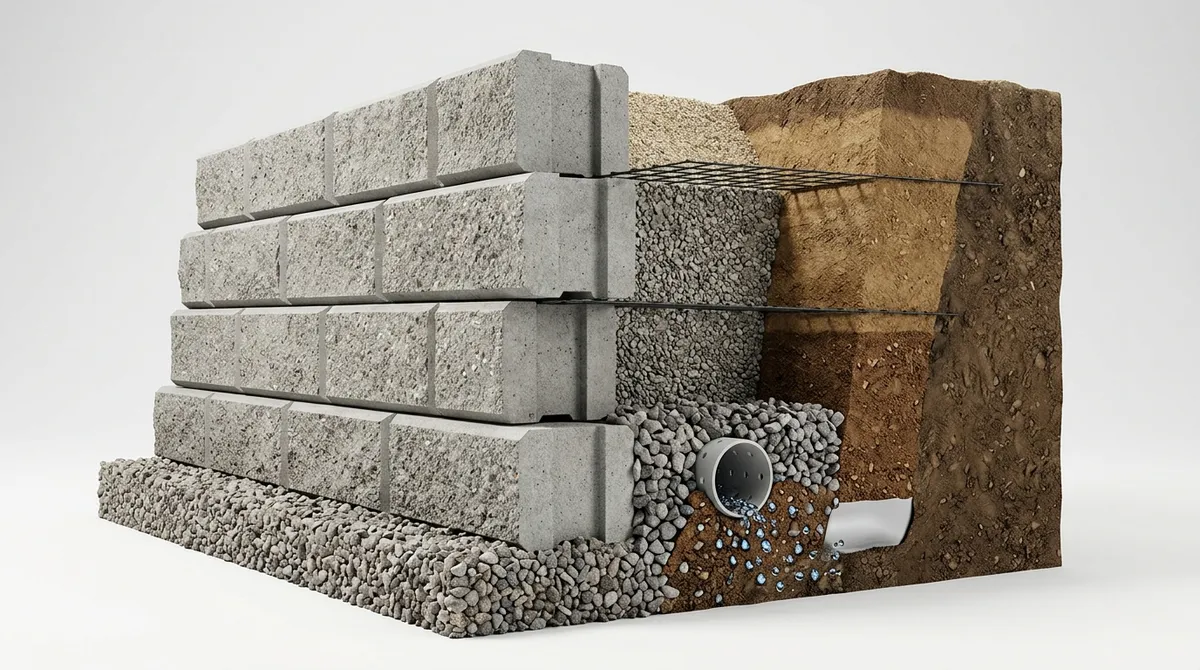
A solid 3-inch compacted base layer using decomposed granite or quarter-minus road base is the most critical stage—skipping this step is the #1 reason installations fail early with bumps and drainage issues.
-
Professional seaming using specialized adhesive and seam tape creates nearly invisible bonds between turf sections, requiring careful blade direction alignment for a natural appearance across the entire installation.
-
Infill application with silica sand, worked into the turf blades with a power broom, weighs down the turf, improves drainage, adds cushioning, and protects the backing material from UV damage.
-
Residential installations typically take 1-3 days depending on yard size, while proper site preparation including vegetation removal, sprinkler adjustment, and bender board installation creates a clean, professional foundation.
-
Properly installed artificial turf lasts 15-20 years with minimal maintenance (rinsing, brushing blades, removing debris), eliminating mowing, irrigation bills, fertilizing, and pesticide applications.
-
Securing the full perimeter with 6-inch steel nails anchored into the base prevents turf shifting, lifting, or curling over time, especially critical in high-traffic areas and commercial properties.
Thinking about swapping your lawn for artificial turf? You’re not alone. Homeowners and business owners across the greater Chicago area are making the switch every year. Artificial turf looks great, stays green year-round, and saves a serious amount of time and money on upkeep. But how does the installation actually work? That’s the question we hear most often.
The artificial turf installation process is more involved than simply rolling out a green carpet. It takes skill, the right materials, and a solid understanding of your outdoor space. When done correctly, the results are stunning and long-lasting. When done wrong, you end up with bumps, poor drainage, and a lawn that looks anything but natural.
In this guide, we’re breaking down the five key stages of professional artificial turf installation. Whether you’re a suburban homeowner, a commercial property manager, or a small business owner looking to boost curb appeal, this breakdown will help you understand exactly what to expect — and why every step matters.
Why Artificial Turf Is Worth the Investment
Before we dive into the process, let’s talk about why so many people are choosing artificial turf in 2026. The numbers speak for themselves. A properly installed and maintained artificial lawn can last 15 to 20 years. That means no more mowing, no more irrigation bills, no more fertilizing or pesticide applications.
For Chicago-area homeowners dealing with clay-heavy soil, unpredictable weather, and HOA standards, artificial turf is a practical and beautiful solution. Commercial property managers love it because it keeps outdoor spaces looking polished with minimal maintenance. And for new home builders in Aurora and surrounding suburbs, it’s a turnkey feature that appeals to buyers right away.
To explore the full range of outdoor transformation options available, check out the Gallery of our work for inspiration before you start planning your project.

Stage 1: Site Preparation and Clearing
Every great artificial turf installation starts with a clean slate. This first stage is all about clearing the existing space to create the right foundation. Professionals remove existing grass, weeds, and any debris from the area. If there are active sprinkler heads or irrigation lines, those need to be adjusted or capped off during this stage.
Here’s what happens during site preparation:
- Existing vegetation is removed down to the soil level
- Sprinkler heads are adjusted or removed to avoid interference
- Boundaries are marked clearly around the installation area
- Bender board (a flexible edging material) is installed to create clean borders between the turf and surrounding landscaping features
- Drainage slope is assessed and adjusted if necessary
Getting the boundaries right is especially important. The bender board creates a crisp, clean line between your artificial turf and other landscaping elements like softscapes, garden beds, or pavers. This detail is what separates a professional installation from a DIY job.
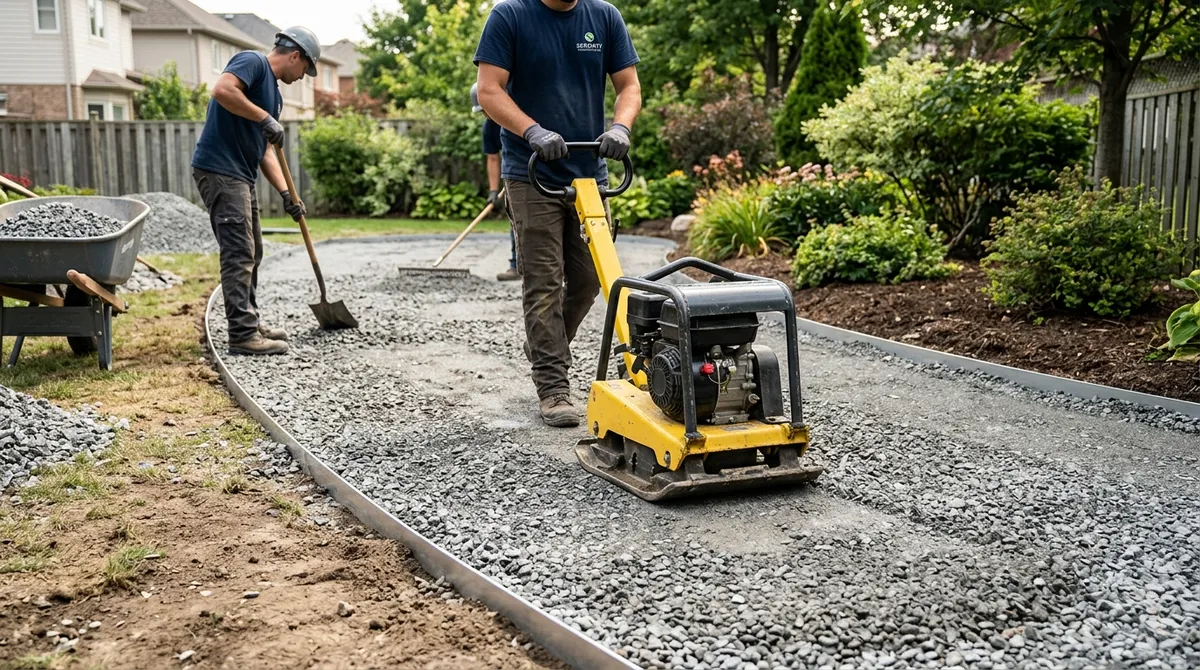
Stage 2: Building the Base Foundation
This is arguably the most important stage of the entire process. A solid base is what keeps your artificial turf looking flat, draining well, and holding up under foot traffic for years to come. Skipping or rushing this step is the number one reason installations fail early.
Professionals typically use one of two base materials:
- Decomposed granite — a natural, compacted material that drains well and provides excellent stability
- Quarter-minus road base — a crushed aggregate that compacts tightly and creates a firm, level surface
The standard depth for the base layer is 3 inches of compacted material. Specialized compaction equipment is used to level and press the base down firmly. This ensures there are no soft spots, uneven areas, or future settling that could cause bumps or drainage issues.
According to Landscape Illinois, proper sub-base preparation is one of the most critical factors in the longevity of any outdoor surface installation, and artificial turf is no exception.

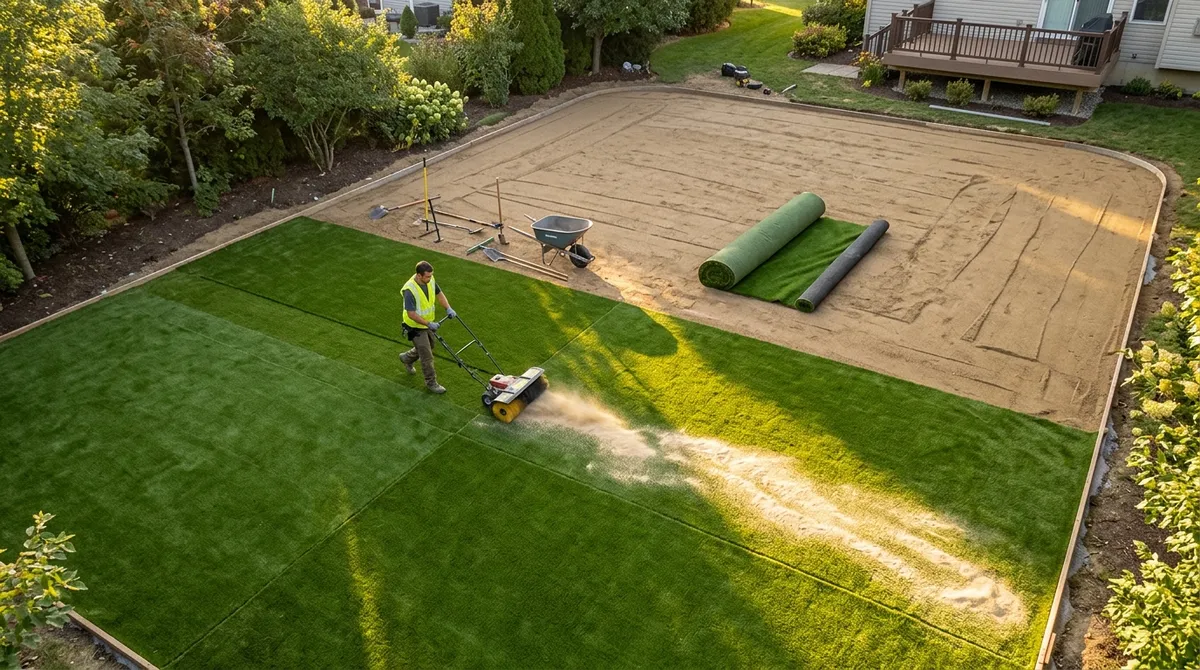
Stage 3: Laying and Cutting the Turf
Once the base is compacted and ready, it’s time to roll out the turf. This stage requires precision. Professionals measure the installation area carefully and cut the artificial turf to fit. The goal is to minimize visible seams and align the turf’s grain or blade direction consistently across the entire space.
Here’s what the laying and cutting process looks like:
- Turf rolls are positioned across the prepared base
- Each section is carefully cut to match the shape of the space
- The blade direction (also called the “grain” or “pile direction”) is aligned consistently so the lawn looks natural and even
- Multiple sections are laid out before any are permanently secured, ensuring the best fit
For larger yards or commercial spaces, multiple rolls of turf are needed. That’s where the next stage — seaming — becomes critical.
Stage 4: Seaming and Securing the Perimeter
Seaming is the process of joining two pieces of turf together so the connection is nearly invisible. When done right, you genuinely can’t tell where one piece ends and another begins. This is a skill that takes practice and the right materials.
Professional installers use seam tape and a specialized adhesive to bond turf sections together. The adhesive is activated with a spray bottle during the seaming process, creating a strong and flexible bond. Each EPS seam kit covers approximately 32 linear feet, so larger projects require careful planning to ensure consistent results.
After seaming, the perimeter of the entire installation is secured using 6-inch steel nails anchored into the base material. Edges are carefully tucked and trimmed for a polished, finished look. This step also prevents the turf from shifting, lifting, or curling over time — especially important in high-traffic areas.
Key points about seaming and securing:
- Seam tape and adhesive create a nearly invisible bond between turf sections
- Blade direction must match perfectly across seams for a natural appearance
- 6-inch steel nails are used around the full perimeter for stability
- Edges are tucked neatly for a clean, professional finish
- High-traffic zones may require additional securing points
For commercial properties, strong seaming is especially important. A property manager doesn’t want a turf edge lifting up near an entrance or walkway. If you’re managing a commercial space, our Commercial Lawn Maintenance services can help you keep every outdoor surface looking sharp year-round.
Stage 5: Infill Application and Final Grooming
The final stage of the artificial turf installation process is infill application. This is often the step that surprises homeowners the most — yes, even artificial grass needs something spread on top of it!
Infill material, typically silica sand, is spread evenly across the installed turf using a broadcast spreader. The sand is then worked down into the base of the turf blades using a power broom or stiff brush. This does several important things:
- Weighs the turf down and adds stability
- Helps the turf blades stand upright for a natural appearance
- Improves drainage performance across the surface
- Adds cushioning and comfort underfoot
- Protects the backing material from UV exposure and wear
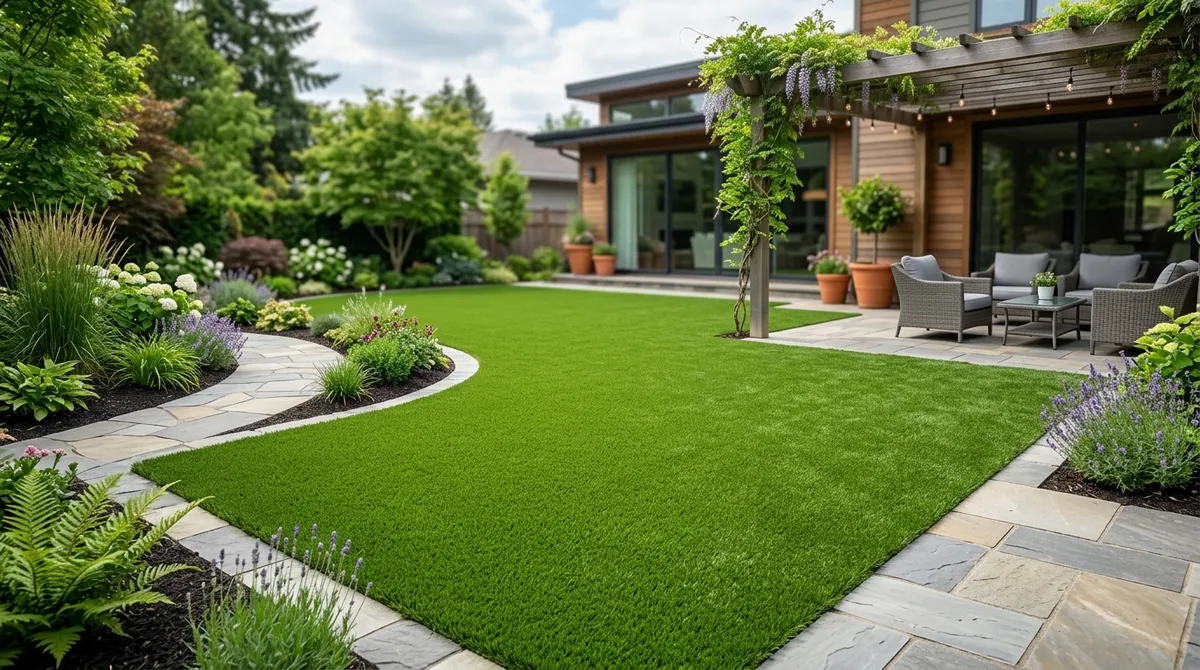
After the infill is applied, the turf is groomed with a power broom to lift and fluff the blades. This is what gives freshly installed artificial turf that lush, inviting look. The final result? A lawn that looks and feels surprisingly close to the real thing — but with none of the ongoing work.
How Long Does Artificial Turf Installation Take?
One of the most common questions we hear is: how long will this take? The honest answer is that it depends on the size and complexity of your space. On average, most residential installations are completed in 1 to 3 days. Larger yards or commercial properties with complex shapes may take a bit longer.
| Project Size | Estimated Installation Time | Key Consideration |
|---|---|---|
| Small Yard (under 500 sq ft) | 1 day | Minimal seaming required |
| Medium Yard (500–1,500 sq ft) | 1–2 days | Some seaming and base work |
| Large Yard (1,500+ sq ft) | 2–3 days | Multiple turf rolls and seam planning |
| Commercial Property | 3+ days | Complex shapes, high-traffic requirements |
Understanding the timeline helps you plan accordingly. Most professional installers can give you a fairly accurate estimate once they’ve assessed your space in person. You can learn more about how projects are planned and managed by visiting our project process page.
Pairing Artificial Turf With Other Outdoor Features
Artificial turf looks even better when it’s part of a well-thought-out overall landscape design. Many homeowners and property managers choose to combine their turf installation with complementary features that elevate the entire outdoor space.
Some great pairings to consider:
- Pavers — create beautiful walkways, patios, and borders that complement the turf’s clean lines
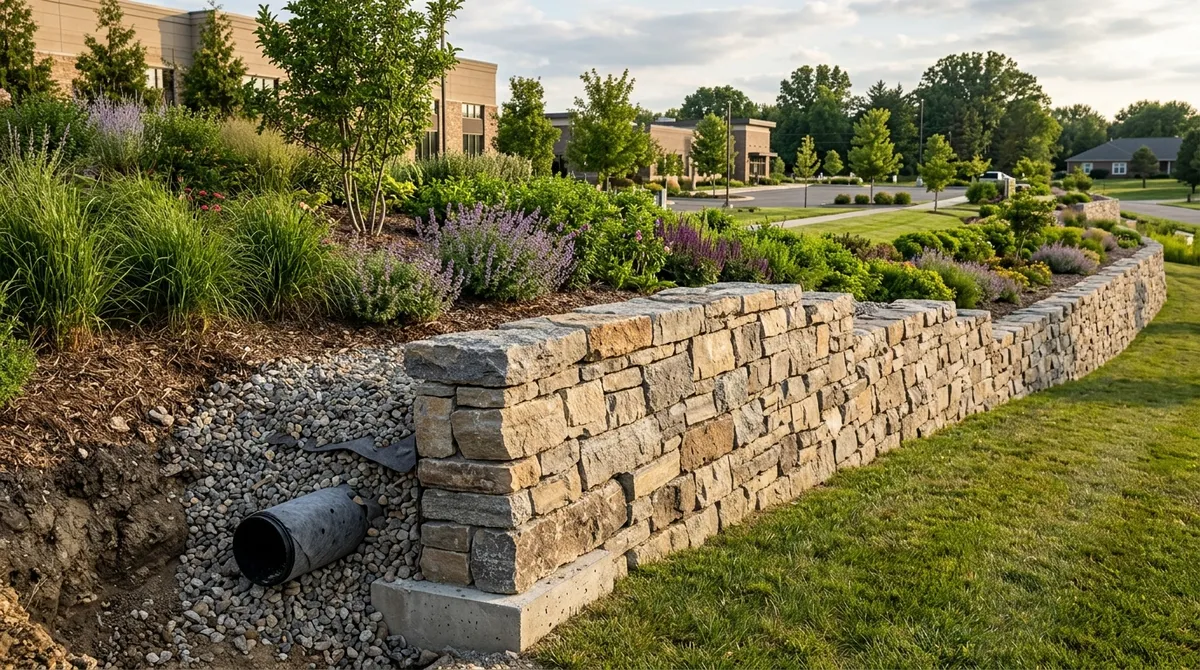
- Retaining walls — add dimension and structure to sloped yards
- Fire pits — create a cozy gathering area adjacent to your turf space
- Landscape lighting — showcase your turf at night and improve safety
- Pergolas and pavilions — create shaded outdoor living areas alongside your lawn
At Serenity Landscape Group, we specialize in creating complete outdoor environments that bring all of these elements together. Our team has been transforming outdoor spaces across the greater Chicago area for over two decades, and we love helping clients build outdoor spaces they actually use and enjoy.
For more design ideas and to see how artificial turf fits into a broader landscape plan, check out our guide on how to create a landscape design that transforms your space.
Caring for Your Artificial Turf After Installation
Once your turf is installed, maintenance is refreshingly simple. That’s one of the biggest reasons people make the switch! Here’s a quick overview of what upkeep looks like:
- Rinse regularly — use a garden hose to rinse off dust, pollen, and light debris
- Brush the blades — use a stiff-bristle broom to keep the turf blades standing upright
- Remove debris promptly — leaves and organic material should be cleared to prevent mold buildup
- Check edges periodically — make sure the perimeter nails and bender board remain secure
According to the ICPI Certified Installer guidelines for outdoor surface maintenance, consistent light upkeep dramatically extends the lifespan of hardscape and landscape surfaces — and the same principle applies to artificial turf. With basic care, your turf can look great for the full 15 to 20 year lifespan.
Ready to Transform Your Outdoor Space?
The artificial turf installation process is a multi-step, skill-based job that delivers incredible results when done right. From site prep and base compaction to seaming, securing, and infill application — each stage plays a vital role in creating a lawn that looks beautiful, drains well, and lasts for decades.
Whether you’re a homeowner dreaming of a lush, green backyard without the weekend mowing, or a commercial property manager looking for a low-maintenance solution that keeps your property looking sharp, artificial turf is a smart investment. And when you pair it with expert installation from a team that knows the Chicago landscape inside and out, the results truly speak for themselves.
Visit our dedicated Artificial Turf Installation page to learn more about our services and approach. When you’re ready to take the next step, we’d love to hear from you — request your free estimate today and let’s start planning your perfect outdoor space together.
FAQs
Q: Do I need to remove my existing grass before artificial turf installation?
A: Yes! Removing existing grass and vegetation is a key part of the site preparation stage. Leaving organic material beneath your turf can lead to uneven settling, drainage problems, and even odor over time. Your installation team will handle this as part of the process, so you don’t need to worry about doing it yourself.
Q: Can artificial turf be installed over concrete or existing hardscape?
A: Absolutely — artificial turf can be installed over concrete in many cases, which makes it a popular choice for rooftop spaces, patios, and urban condo areas. The installation approach is slightly different since you’re skipping the base compaction stage, but the turf is secured with adhesive and the results look just as great.
Q: How long does artificial turf last compared to natural grass?
A: With proper care, professionally installed artificial turf can last 15 to 20 years — and it stays green and consistent the entire time! Natural grass, by contrast, requires constant attention and still struggles in extreme conditions like Chicago’s harsh winters or dry summers. Artificial turf is a one-time investment that keeps paying off.
Q: What maintenance does artificial turf require after installation?
A: Artificial turf is wonderfully low-maintenance! You’ll want to rinse it periodically, brush the blades upright with a stiff broom, and remove leaves or debris promptly. That’s really it — no mowing, no watering schedule, and no fertilizing. It’s one of the most freeing upgrades you can make to your outdoor space.
Q: How much does professional artificial turf installation cost?
A: Costs vary depending on the size of your space, the type of turf material selected, and the complexity of the installation area. The best way to get an accurate number is to request a free on-site estimate — that way, your installer can assess the space, discuss your goals, and give you a clear, transparent quote with no surprises.